Sunday, January 22, 2017

Paper Lanterns Wall Hanging

https://www.craftsy.com/quilting/patterns/paper-lanterns-wall-hanging/476205
There's a new pattern in my Craftsy Pattern Store!

https://www.craftsy.com/quilting/patterns/paper-lanterns-wall-hanging/476205

 The Asian lanterns in the main print of the Serenity line by Riley Blake were the inspiration for this tumbler block wall hanging. The simple layout creates a stunning design. This is a great beginner level pattern, and a quick and easy project that will make a big statement on your wall.

https://www.craftsy.com/quilting/patterns/paper-lanterns-wall-hanging/476205

I started this pattern several years ago, but didn't have a chance to finish the quilting until this month! It makes me happy to finally have it hanging on the wall!

Since we moved (1 1/2 years ago!!) I hadn't put my quilt racks on the wall. I decided I didn't want the heavy look in the new house. So the wall stayed empty until right after Christmas when I finally took the time to make some hanging rods.

This is a really simple design. It's just some small boards (about 3/4" x 1 1/2") cut to 36" lengths. Then I screwed some cup hooks in the end. One of them I spray painted white, and the one in the photo is unpainted.

https://www.craftsy.com/quilting/patterns/paper-lanterns-wall-hanging/476205

A long nail is all it takes to hang it on the wall.

36" long gives me some room to have larger and smaller wall hangings without having to move the placement of the nails. I just have to remember to keep the hanging sleeve small enough that the hooks stick out.

In the last three weeks I've had three different quilts on the wall! They are simple to swap out and the look is clean and modern.

Click on any picture above to find the Paper Lanterns Wall Hanging pattern in my Craftsy Store!

Thursday, March 24, 2016

Craft Show

Life has been whizzing by since the last time I posted! At the beginning of March I participated in a craft show, the first time I have sold at one in YEARS! I wanted to make a good impression, so I worked pretty hard leading up to it. 


This quilt block, the Bethlehem Star, has basically become my logo. I made the one above as a mini quilt. It's only about 12" wide.


Below you can see the same star appliqued on my apron. 


Here's my booth set up! 
 I brought in some shelves from home to make it look like a specialty boutique instead of a table with some homemade stuff on it.
I printed the covers of the patterns I sell on Craftsy and hung them like mini quilts. I thought about having printed patterns, but didn't take the time to do that this time around.


Here's my little business cards in action. 
My daughter hung out with me part of the day. It was fun and really helpful to have her there with me.

I haven't blogged this quilt yet. I need to get the binding on it, and then it will be the next pattern I list for sale!
 Boho Pleated Bag
 I ordered these awesome eyelet zippers from Amazon. I seriously love them!
More zipper pouches. My business cards are also price tags. On the back I have room to say something about the item and write the price.
Microwaveable Bowl Potholders. Sadly I did not sell any of these! I think people didn't realize what they were for.
 The very last of my Circa 1934 fabric.
This table runner was the first thing that sold! I thought very hard before taking it to the show. But I have a whole queen sized quilt out of this fabric so I thought I would let someone else enjoy the table runner!
It really felt good to have people admiring my work and BUYING! It was a very small show, but I did well, and I had a blast!
The next show coming up is a big one, so I'll be sewing away to get ready!

Sunday, February 21, 2016

A New Look

Hello! Welcome to the new look of KMS Handmade!


Please take a moment to follow KMS Handmade on Bloglovin, or update your feeds by using one of the options to the right.


I have been spending some time working on re-designing my brand and really putting together a cohesive image. Over the course of this evolution I have settled on a new name - KMS Handmade.


I have gone by Kelly's Korner since 2000! I thought it would be fun to share some of the early designs and show the evolution of my look over the years.


Kelly's Korner makes me think cute and cuddly. This was my logo in 2000.


(blurred my old address and phone number)


I was in college, freshly married, and had a newborn. I was crafting in my home and attending local craft shows including the Rail Head Trade Days in my hometown. My main craft at that time was polymer clay figurines.


I still have these two little bears. I have a few more pieces from that time period as well.


I also did some freelance computer work for people. I was very new to computer design and played around with business cards, birth announcements and stuff.


Two of the biggest jobs I got were to design a menu for a local restaraunt, and to type a book for the mayor that he self-published. 


In 2008 I learned about blogging and wanted to blog under the name Kelly's Korner. Unfortunately that blog was taken on Blogger, so I had to go with kellys-krafts, but I still titled it Kelly's Korner. 


And I got a new business card. I was experimenting with minimalism.
 (Actually they were free cards from Vista Print!)


From 2009 to 2011 I designed Digital Scrapbooking products under the name KD Designs.


My design skills were obviously greatly improved at that point, and I was experimenting with something a little more sophisticated. KD Designs stands for Kelly's Digital Designs. 


Here's how Kelly's Korner upgraded, thanks to the new style:


In 2013 my style started changing again to a more simplistic, geometric look.


This is where the kms abbreviation made its first appearance.


Then in 2013 I learned how to customize the favicon - the tiny little logo next to the website name at the very top of your browser. This was my first one:

And this is where I knew I was on to something.


For years I had wanted to get sewing labels for the things I make, but I didn't know what I wanted them to look like. So I didn't get anything. But the blog and that little kms got me thinking.


And kms handmade was born!

I had labels printed on white cotton over at Spoonflower.com, and I sew them into everything I make now. 

At my last job I couldn't sell crafts, because it was a conflict of interest. (Since I was in charge of all the contracts.) But now that I have changed jobs I have more freedom. And next month I will participate in my first craft show in YEARS! I am so excited!!


I wanted to have a nice look for the show, so I ordered new business cards that double as hang tags for the items I'll be selling.


I even ordered a couple of fun things just for me!


(The quilt block featured is the Star of Bethlehem.)


The name Kelly's Korner was great for the time, but I think my skills and my style have grown up since then. I think KMS Handmade fits where I am now and I LOVE the new colorful design, and the simplicity of the logo with the thread.


I hope you have enjoyed seeing the evolution of a logo, and I look forward to sharing more handmade goodies with your here at the new and improved blog!

Monday, January 4, 2016

Star Wars Halloween

The force is strong in my family. 


Ok, really, I just humor my grown up kid husband. Or rangled him into participating in Halloween by agreeing to a Star Wars theme. 
 How could I resist? 


Our new station in Belgium doesn't really have on-base housing, so MWR sponsors Trunk or Treat on base. This is our first year to actually get to give away candy instead of just doing the trick or treating. I was pretty excited to participate!
 Our little mini doesn't have much decorating space, but we managed to cram the whole cockpit of the Millenium Falcon in there!
 This is a lot of cardboard and duct tape! Will this rust bucket even get off the ground? 
Head for that small moon. Wait, I don't think that's a moon...


Ethan, use the force....
 The robe is a modified version of the Amy Butler Raincoat. I just made the hood bigger and belled out the sleeves. The tunic probably needs to be done over... but it worked ok. It is a modified version of a Kimono Wrap Dress. And the pants are just traced from PJ pants! Ethan thinks this costume is so comfy, I still catch him wearing it some days. 


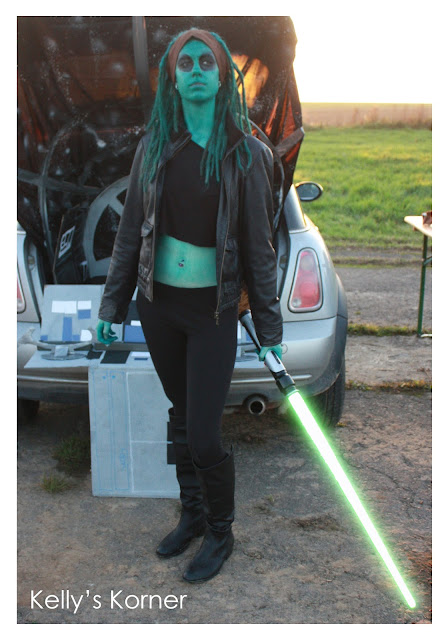
Nautolan Jedi
 Haven's character is kind of a combination between these two characters:


Since she has the dreadlocks we wanted to play with them as an alien tentacle feature. Her body paint is just lotion mixed with food coloring! It worked brilliantly! I used the new Wilton color mixer set and followed the "recipe" for teal. It came off of her skin pretty easily, but it stayed in her hair quite a while. She ended up using hair bleach to get the last of it out.


I was Padme Amidala, in one of her costumes from Episode 3.
 Here she is for reference.

Now, she was pregnant in this costume. I most definitely am not. But this costume was the easiest and used the least amount of fabric. I used the Bianca Tunic pattern from Made by Rae for the top. I drafted up a turtle neck of sorts, and then cut it open in the front to form a tall collar. 


Bum bum bum bum bu dum bum bu dum...
Rob can't stand too long, so we had to make him a costume where he could be sitting the whole night. I was inspired by several wheel chair Tie Fighters I've seen on the internet (and once in person at the Star Wars convention!). We made him a lawn chair Tie Fighter! The costume is one of those cheapy onsie kinds. We chopped off the pants and just used the top and the cape. Then we ordered one of those voice changer helments and some nice Darth Vader gloves. 


It's all about the props! 

We wanted to have something cute for the kids, so I made this little knock down the can game. We had some balls, but we didn't want them getting lost in that field in the background. (Actually we did lose one...) So Rob whipped up these meteors out of duct tape! 

 Who's that driving my car????
 The R2D2 trashcan got the most attention, with the Tie Fighter/Darth Vader coming in second. 
This is a plain white trash can decorated with spray paint, painters tape and paint markers. 


We were not in the running for the trunk contest, since we work for MWR, but we got a lot of compliments on our set up. The winners had really awesome trunks, so we'll have to step it up next year! We have already started brainstorming!! 

And for the win - we reused our costumes to dress up for the opening night of the new Star Wars movie, The Force Awakens. Nerd family for the win!

Friday, January 1, 2016

2015 Craft Review

2015 was a very busy year for the Sarles Family. In my last post (way back in May!) I casually mentioned we were moving to Belgium. Yep, that happened. And because of that our life got really hectic. SO this is a pretty short list of things I made in 2015. 

Things I made in 2015

Quilts

Winter's Lane Quilt
Started in 2013, but finally finished in 2015


Twister Quilt
Started in 2012, but left half bound until 2015

Petrina's Double Slice Quilt

Clothes

Apron

Granville Shirts

 Renfrow Top with Cowl Neck


Halloween Costumes

Sweets

Bowling Cookies

 Valentine's Cake


Dream Catcher Cake