Sunday, November 3, 2013

Halloween

Hello blog! Long time no see!

I've been crafting like crazy, but have not taken the time to photograph things. Most of it has been for work, but eventually I'll get it photographed and on here. I've been quilting a lot lately. The quilting took a back seat, though, while we created our Halloween costumes.

Haven wanted to be Sonic the hedgehog, but that proved a little out of reach. So she decided to be Pikachu and she had her boyfriend, Marius, dress up as Ash, the player from the TV show. We ordered Haven's costume, which is basically giant fleece pajamas. We ordered the hat for "Ash" and Haven made his jacket by taking the sleeves off of a blue hoodie and layering it with a white shirt. It worked perfectly!
 Ethan wanted to be Steve from Minecraft. If you aren't familiar with the game then you probably don't have a young boy living in your house. It's an 8-bit video game that has a crazy following. I can't say I truly understand it's popularity, but whatever. We couldn't walk two feet without someone yelling "STEVE!" all night long!
 I had decided back in the summer that I wanted to be Merida from "Brave." I bought the bow and arrows at the Medieval market months ago. I know the picture doesn't show the elbows, but I got the poofy bits of fabric in there. The cape was a last minute decision, and I'm really glad I made it because it ended up being COLD. Oh, I even wore hair extensions to get the long red curly locks. I couldn't get my hair quite as full as hers... that's computer magic. But the kids knew who I was.
I've been trying something new with scrapbooking. I'm intrigued by the Project Life products we've been selling in our store. They aren't a new concept, but they've really gained in popularity the last couple of years. They are little pockets where you slip in cards or pictures instead of doing a detailed scrapbook page. They come in digital form too. So here are two pages I made using this style.


I kind of like the clean, simple look of it. And it's for sure easier than doing all the fancy layering and all. I haven't done much scrapbooking in the last year, so I guess if this helps me start working with my photos again then it's a good thing.

Tuesday, September 17, 2013

Minecraft Crafting

Do you have a boy in your life who has gotten sucked into the wonderful world of Minecrafting? I do. It doesn't make me happy. But I suppose it's better than shooting games and blood and gore. If you aren't familiar, you can read about it here. It's quite the "movement."

This school year we have a new rule. No screen time during the school week. Can I tell you how much this has improved our evenings? Well, at least mine. Ethan thinks I'm torturing him, but it has made a huge difference in my stress levels. It's so quiet in the house now! Do you have school age kids? How much electronic entertainment do you allow during the week? 

Even though I think Minecraft is terribly boring, I get that Ethan and all his friends enjoy it. Since a couple of boys have birthdays this week I decided to do some Minecraft crafting of my own. I've been using this Interfacing Piecing method to make blocks with 2 1/2" squares. (I have a few more projects in line to be blogged)

Minecraft Pillow

This is the front and back of the pillow. The front character is called "Creeper" and the back character is called "Enderman." I used five different colors of green, plus black to make creeper. Ethan L.O.V.E.D. it. He didn't really want to give it away as a gift, but I assured him more would be coming. I have plans to make other characters too.

Wednesday, September 11, 2013

Let the Fall Sewing Begin!

Fall is in full swing here in Germany! It is COLD. That's ok though, because that means I can start sewing fall clothes. 

I'm not finished with the Washi Tunic yet. I feel like there are a few more things I can try with it. This one is rayon and I added sleeves. Oh, and pockets! Even though the pockets are intended for the dress length I decided to see if I could make them work. I little resizing so they didn't hang too low, and it worked!
The pattern doesn't come with a sleeve (just the cap one) so I drafted this one. I used a combination of the School House Tunic sleeve and a bell sleeve from this shirt. This is my favorite one so far.

Fabric: Valorie Wells Novella Rayon
Pattern: Washi Tunic

I never blogged these pants, but they are part of my "PJs I can Wear to Work" series. *wink*
It's a nice stable knit with a pinstripe pattern. From a distance most people can't tell they are knit! But they are like wearing sweats to work. Love them!

Next up a blouse from Hilco's Knip Mode magazine. This is my third time to make this blouse, and my favorite version. I did the sleeve cuff in linen and then used the "J. Crew sleeve roll." That cracks me up. They have their own brand of sleeve roll!
Fabric: Blythe from Robert Kaufman
Pattern: Knip Mode blouse (no name)

I also made another knit pencil skirt. I'm loving these! So comfy and cute and easy! (not such a good hair day...)
The knit pencil skirt is just a tube! So easy. This one is one tremendously long tube folded in half. The single layer of knit wasn't thick enough so I doubled it, which meant I only had to hem the top since the bottom is folded. SO.EASY.

So those are my first fun outfits for this fall!

Sunday, September 1, 2013

Progressive Dip Party

So if you follow me on Pinterest you might have been wondering what I've been up to with all the food pins! Tonight at church Rob and I organized a "progressive dip party." It was my night to do the snacks and I have a bit of a reputation for being the American who always brings the cupcakes and cake. So I thought I would surprise everyone with something completely different.

So each table got a different dip, and then every few minutes we rang a gong (yes I have a gong) and everyone had to change tables. It was more like musical chairs than a progressive dinner, but we thought calling it a progressive dip party was fun.

So of course I forgot to take my camera and got zero pictures. OH, I forgot to mention the most fun part. Our church is German, so there was only one other American family there. Everyone was from other countries, so all these were brand new to them! It really went awesome and everyone had a great time!

Ok, so since I have no pictures (shame on me) I am using the pictures that I pinned to show the dips. I wanted to share because they were all really yummy. Links go to the recipes.


A classic. We served it with Fritos scoops and blue corn tortilla chips.


This dip was pure genius. It's everything you put on a baked potato, and then you use potato chips as the potato. Delish.


This was fantastic! This one got the most votes for favorite. I served this with Ritz crackers and butter crackers. 


I had this for the first time about a year ago, or maybe longer. A customer brought it to a craft class. It is yummy. I have made this many times since then. It's great for a light snack on summer nights. I serve this one with Tostitos scoops.


Whoever pinned this one just pinned the whole recipe! I used this recipe instead of the one on the artichoke can and it was yummy. I split it between two bread bowls to serve. One table got bread and one table got crackers. I made all the bread too. 


I used the recipe above and have used it several times. I got a Dutch Oven for Christmas last year and it works really well. 

But I decided over the weekend I need to step up my bread making game. So I decided to dive in and begin a sourdough starter. I'm using this recipe. I'm two days in. We'll see how it goes when I have to remember to "feed" it during the week... I'm completely fascinated by the idea of growing my own yeast cultures. 

Ok, so like I said NONE of these are my pictures. But I wanted to share that all these recipes are winners. So if you are heading out to a party, I recommend any of them.

Saturday, August 31, 2013

Raglan T-Shirt

This is one of the shirts I made for the trip to the US in the summer. It was super easy! I used this tutorial, which was actually written for a child's shirt, but translated to an adult shirt just fine. I had seen this shirt during the Spring Top Sew-Along and I immediately googled the fabric and ordered it online!! 

At first I tried a different pattern, but I ended up messing up the pink fabric. So in the end I copied it almost exactly! Why try to improve on perfection?

So here is one of the process shots. I ended up finding a cheapo pink t-shirt to replace the pink fabric I ruined. I was able to cut the sleeves from the shirt bottom so I didn't have to do hem them!
 If you think you want to make one, do follow the instructions in the link above. They are great!

And here's the shirt in action, at Corinnea's house.
I think I should have made a bit deeper and rounder scoop neck, and probably a little longer at the bottom. But other than that, it turned out to be a great easy wearing t-shirt.

Fabric: Heaven & Helsinki, Patty Young
Pattern: Raglan Tee Tutorial

Sunday, August 25, 2013

Ready for Rainy Days

So I recovered an umbrella. No big deal. Just another day.

Haha! So not true; It was a big deal! I am incredibly pleased with myself. I loved your Instagram comments on my sneak peek! I didn't have the idea on my own. Of course I saw something on Pinterest that gave me the idea, and we sell oilcloth at the store, which is what I used.

I didn't really take many process pictures because I knew there was already a tutorial out there. But now I wish I had done more, because she used a different kind of umbrella, and I used a slightly different process. But no biggie. If you want to read through a tutorial, here's one I found by Me Sew Crazy.

So what I did was disassemble Johnny-5 -  uh no, my Totes umbrella. (Who remembers Johnny-5?)
The empty frame TOTALLY reminds me of that guy on Hitchhiker's Guide to the Galaxy with the spindly robot legs.
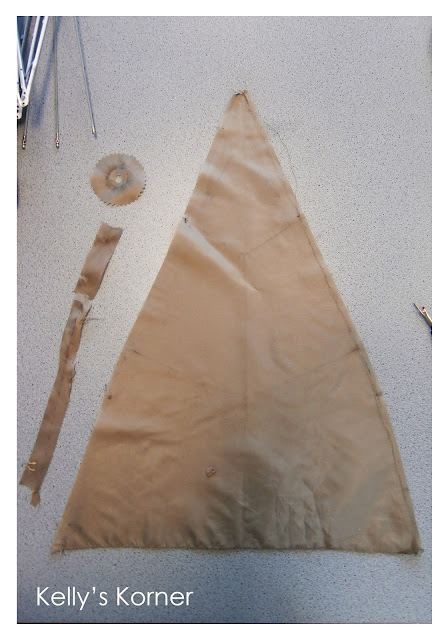
I used a seam ripper to take apart the pieces. That pleated piece was a decoration at the top and turned out to be a long strip. The circle is like a little washer on the inside. I VERY lightly pressed the pieces with a piece of fabric over them to unfold the seam allowances.
I took lots of notes while taking the umbrella apart so I would know how to put it back together when I was finished.
I cut 8 triangles for the umbrella and sewed them together, pressing the seams all in one direction so they twirl around the circle. My pattern piece had a flat tip on the triangle which left a perfectly sized hold to put the screw top through to put it back together. The pleated part was by far the hardest part. Then after I got it all back together I hand sewed the umbrella to the frame.
 I tested it out today in the rain and it works! No leaking!
The only downfall is that the oil cloth is so much thicker than the original fabric that the closed umbrella is super fat now. The velcro tab doesn't actually wrap around the closed umbrella! Oops! Right now I'm using a rubber band to keep it closed! Haha! The tutorial in the link used a silicon spray and regular fabric. I wonder if that's thinner. Plus she used a different kind of frame, which probably helps. But, no matter! I freakin love it.

Used:
1 old Totes umbrella
1 yard oil cloth Joel Dewberry Heirloom
3" velcro

Thursday, August 22, 2013

Previously Unblogged

About a month before I went to the States (back in July) I realized I didn't have enough "summer in Texas" clothes. I mean it's almost year round fall here in Germany and those clothes just weren't going to cut it. So I made a ton of new shirts for the trip. In fact, I'm not even sure now what all I made... I'll have to go through my photos and compare them to the closet! 

Well, this one I know for sure hasn't been blogged.

The tie front blouse is from Knip Mode from Hilco and it fits perfectly! I just love their patterns. I can always count on German patterns to be exactly the right size. They don't seem to change between companies. Thank you Jennifer for this fabric!
And the knit skirt is actually just a half yard of knit sewn into a tube and hemmed on top and bottom. It's tight enough that I don't even need elastic! But not so tight that I feel "on display." The idea is from Crafterhours Knit Pencil Skirt Tutorial but I didn't do lining or anything fancy.
 This quilt was my take on the triangle craze. I taught it as a class at work. It's so summery! I called it "Hidden Hexagons."
 I started with a couple of prints from Lucy's Crab Shack and then added 30 prints. There are five main colors, and I picked six fabrics for each color. I had fun with this process! It was a stretch for me since most everything I do is from one line of fabric.
I have several more things hanging up at the store that I need to photograph. I've basically become the store quilting instructor, so I've been churning out stuff to sell fabric and teach classes. Props to all you girls who used to keep the store so full of samples! It's a lot of work to keep it fresh.

And lastly, a rare moment where the kids were enjoying each other's company.


It's been pretty chill around here lately. I'm really liking the age the kids are at right now. Haven is getting really interesting and grown up. She has a boyfriend right now that I really like. I mean like enough to start planning the wedding... Of course SHE's not talking about that! Ethan is becoming more independent. He's made lots of friends in the neighborhood so there is almost always a kid over here or they play outside. I've had both the kids helping around the house more and this week Ethan did all his own laundry!! School starts on Monday. 4th grade and 10th. I feel so old but that's ok.

Oh, that just inspired me to share this pin from Katelyn:


Substitute coffee for tea and I'm there.

Monday, August 5, 2013

Star Wars Convention Part 5

Part 5: DIY


Last post on Star Wars! This one is about the stuff we made for the conventions. I knew there would be people there wearing really good costumes they had been working on for years. So rather than feel intimidated by that Haven and I tried something different. Have you heard of Disney Bounding? It's wearing regular clothes that give the idea of the character you are dressing as. Of course, with true Disney Bounding you actually go to Disneyland/world and take a picture with your character. So we gave it a try.

Haven and I channeling C3-PO and R2-D2
 R2-D2 shoes inspired by these. I actually did these in the hotel room the night before the convention started! They are my favorite thing made for the show.
I found a comfy white dress to mimic Leia. See my blaster necklace? That's a shrinky dink!
 Ethan doodled hair on his Chewbacca shirt with a Sharpie.
I made the bag two days before we left. Just got inspired and went for it! The "ammo" is made out of little blocks of wood spray painted silver. The bag is a simple messenger bag. I actually had to dye the elastic to get it the right color and I think that's the first time I've dyed anything at home. 
 Look like Yoda, do I? Not really. But it was the last day and I was done trying. 
Haven looking a little like Boba Fett. 
I made lots of t-shirts with the Silhouette heat transfer material. 

Shirts for Rob

 Shirts for Haven
 This one is my favorite
 Shirts in Action

I also made a few pins last minute. I did pins for good guys and for bad guys. 

Ok, that is it for Star Wars! I didn't mean for it to take so many posts to cover, but there really was a lot going on!  

Sunday, August 4, 2013

Star Wars: More about the Show Floor

I got tired after the last post and had to take a little break from Star Wars. :) Except that Ethan decided he needed to have a Star Wars marathon, so over the last few days we watched them in order from 1 to 6.

This is the follow-up to what was going on on the show floor. I guess there wasn't that much left to post!

Some droids chasing around kids waiting in line for something.
People in costume would stand for photos with anyone.  It was a lot of fun! Also funny to see them take breaks and just hang out. Like imagining actual bounty hunters having a beer at the local tavern. 
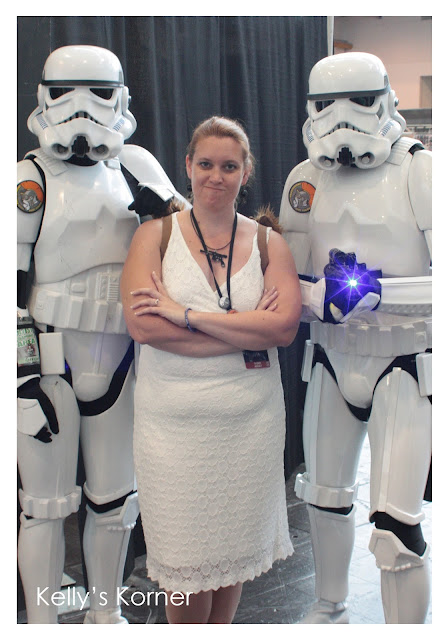
 This was quite a spectacle. I whole huge group of storm troopers and other bad guys. Who's that in the middle?? Is he from Halo?
 Get your hands off me!
 This was pretty cool - a lightsaber demonstration. They were really good! They had a little story they acted out. This was one of Ethan's favorite things that we saw.
 And here's where I totally geeked out. The actual artists who make Angry Birds were there!
 They were in the family area doing a little drawing class for kids. Which I joined with Ethan.
We had a blast! Here are our drawings.
Ok, that's it for the show itself. The last post I have is all the DIY stuff we put together to wear at the show. So one more post to go!