Showing posts with label joel dewberry. Show all posts

Sunday, August 25, 2013

Ready for Rainy Days

So I recovered an umbrella. No big deal. Just another day.

Haha! So not true; It was a big deal! I am incredibly pleased with myself. I loved your Instagram comments on my sneak peek! I didn't have the idea on my own. Of course I saw something on Pinterest that gave me the idea, and we sell oilcloth at the store, which is what I used.

I didn't really take many process pictures because I knew there was already a tutorial out there. But now I wish I had done more, because she used a different kind of umbrella, and I used a slightly different process. But no biggie. If you want to read through a tutorial, here's one I found by Me Sew Crazy.

So what I did was disassemble Johnny-5 -  uh no, my Totes umbrella. (Who remembers Johnny-5?)
The empty frame TOTALLY reminds me of that guy on Hitchhiker's Guide to the Galaxy with the spindly robot legs.
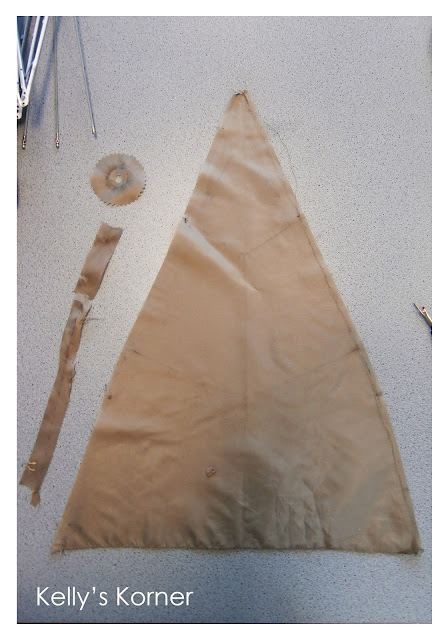
I used a seam ripper to take apart the pieces. That pleated piece was a decoration at the top and turned out to be a long strip. The circle is like a little washer on the inside. I VERY lightly pressed the pieces with a piece of fabric over them to unfold the seam allowances.
I took lots of notes while taking the umbrella apart so I would know how to put it back together when I was finished.
I cut 8 triangles for the umbrella and sewed them together, pressing the seams all in one direction so they twirl around the circle. My pattern piece had a flat tip on the triangle which left a perfectly sized hold to put the screw top through to put it back together. The pleated part was by far the hardest part. Then after I got it all back together I hand sewed the umbrella to the frame.
 I tested it out today in the rain and it works! No leaking!
The only downfall is that the oil cloth is so much thicker than the original fabric that the closed umbrella is super fat now. The velcro tab doesn't actually wrap around the closed umbrella! Oops! Right now I'm using a rubber band to keep it closed! Haha! The tutorial in the link used a silicon spray and regular fabric. I wonder if that's thinner. Plus she used a different kind of frame, which probably helps. But, no matter! I freakin love it.

Used:
1 old Totes umbrella
1 yard oil cloth Joel Dewberry Heirloom
3" velcro

Monday, April 15, 2013

Washi Dress and Tunic


I finally got around to making the Washi Dress, and after one I couldn't stop!

I made the first one as the full length dress, with pockets. (Love the pockets!)

I can't remember the fabric name, but I've been saving it since Corinnea made her School House Tunic.
The dress version is with no alterations.

The second version is the tunic length out of the purple from the same line. At first I put the shirring lines in the wrong place and it was WAY too tight. I picked out all but three lines and I think now it's actually the best fit.
I really like doing the top stitching around the neck so you can see it. It has an Indian feel, don't you think?

Number 3 is with Joel Dewberry Heirloom, which I've been hoarding for awhile waiting for the perfect pattern. I love this one!
The first two were a little snug in the chest area. Instead of doing a full bust adjustment I just widened the bodice about 1/2" and it gave just enough breathing room. If you do something similar remember to adjust your neck facing too!

I also switched the pleats to point away from my belly instead of towards the middle. This made the front lay a bit flatter. This is important because if it "poofs" out I look pregnant! This is a side effect of a round belly and an empire waist line.

You can see from the back though that I need to hit the gym... The shirring is not at a pretty spot on my back.

For the fourth version I was inspired by Rae's two-fabric Geranium dresses. I added piping and a contrast band at the bottom. This one is my favorite!


I also added a back dart to try to give some more shape over my tush. Steph C wrote an interesting post called "Cup Sizes for your Derriere" that you might want to read if you have any shape to your backside. It is more for bottoms than tops, but I wanted to share anyway.

I think I will make at least one more version and use a longer sleeve. I don't like showing so much of my arms. I also may try stitching down the pleats just an inch or so and see if that helps with the unwanted maternity look. 

One last thing about this pattern - I thought you might like a comparison between Washi and School House tunic. These two patterns have a lot in common. They both have pleats, empire waist, and are of course tunics. I like the pleats and the neckline in Washi. You don't have to wear a camisole under this one like you do under the school house. I also like the pockets in the Washi and the shirring on the back, even though it may need some tweaking on me.

What I like better on the school house tunic is the sleeves. I prefer a longer sleeve on my arms. 

Overall I really like the Washi Tunic and am glad I finally made it!

If you shop at Patch Arts and Crafts we carry both the Washi Tunic (and School House Tunic), and I will be teaching it as a class later this summer.